Creating a first Project
In this section we are gonna walk through the process of creating a new very simple scene where we are gonna attach a NativeScript made with Go and compiled as a C shared library.
Pre-requisites
In order to build the example described in this page you need the following packages to be present in your computer:
- GDNative-Go library already installed
- make
- a C compiler (GCC or Clang or Mingw-w64)
- An up to date version of the Go runtime and compiler (1.14.4 at the moment of writing this lines)
- Godot 3.2.1 or superior
- a source code editor
Windows users please refer to the Godot documentation to check which options do you have in order to compile godot and use the same compiler to compile NativeScript libraries
Create a new Godot project
First we need to create a new Godot project, as it is shown in the screenshot below:
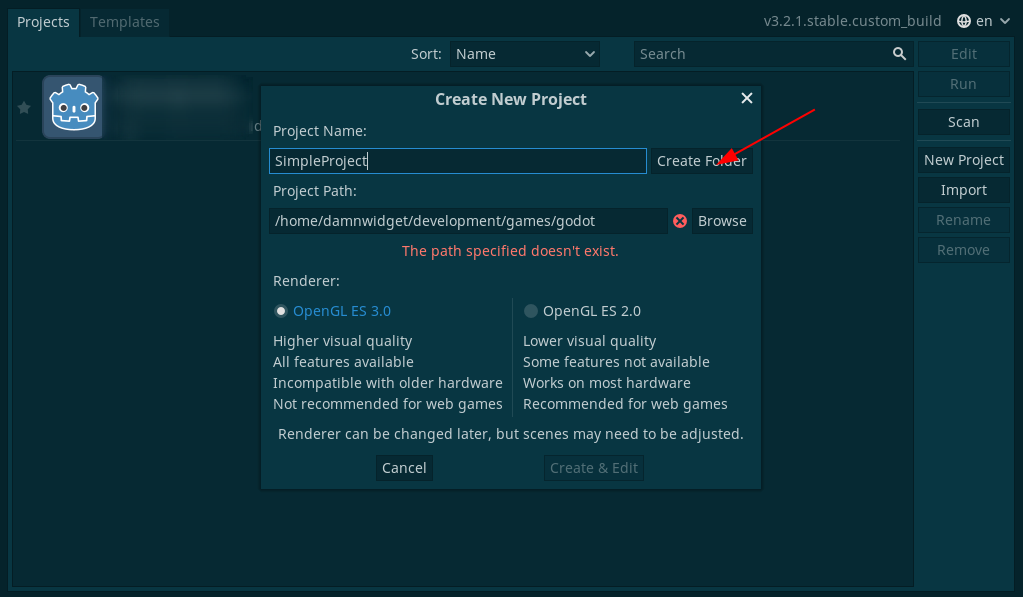
you can click the Create Directory button and Godot will create the target directory for your new project automagically
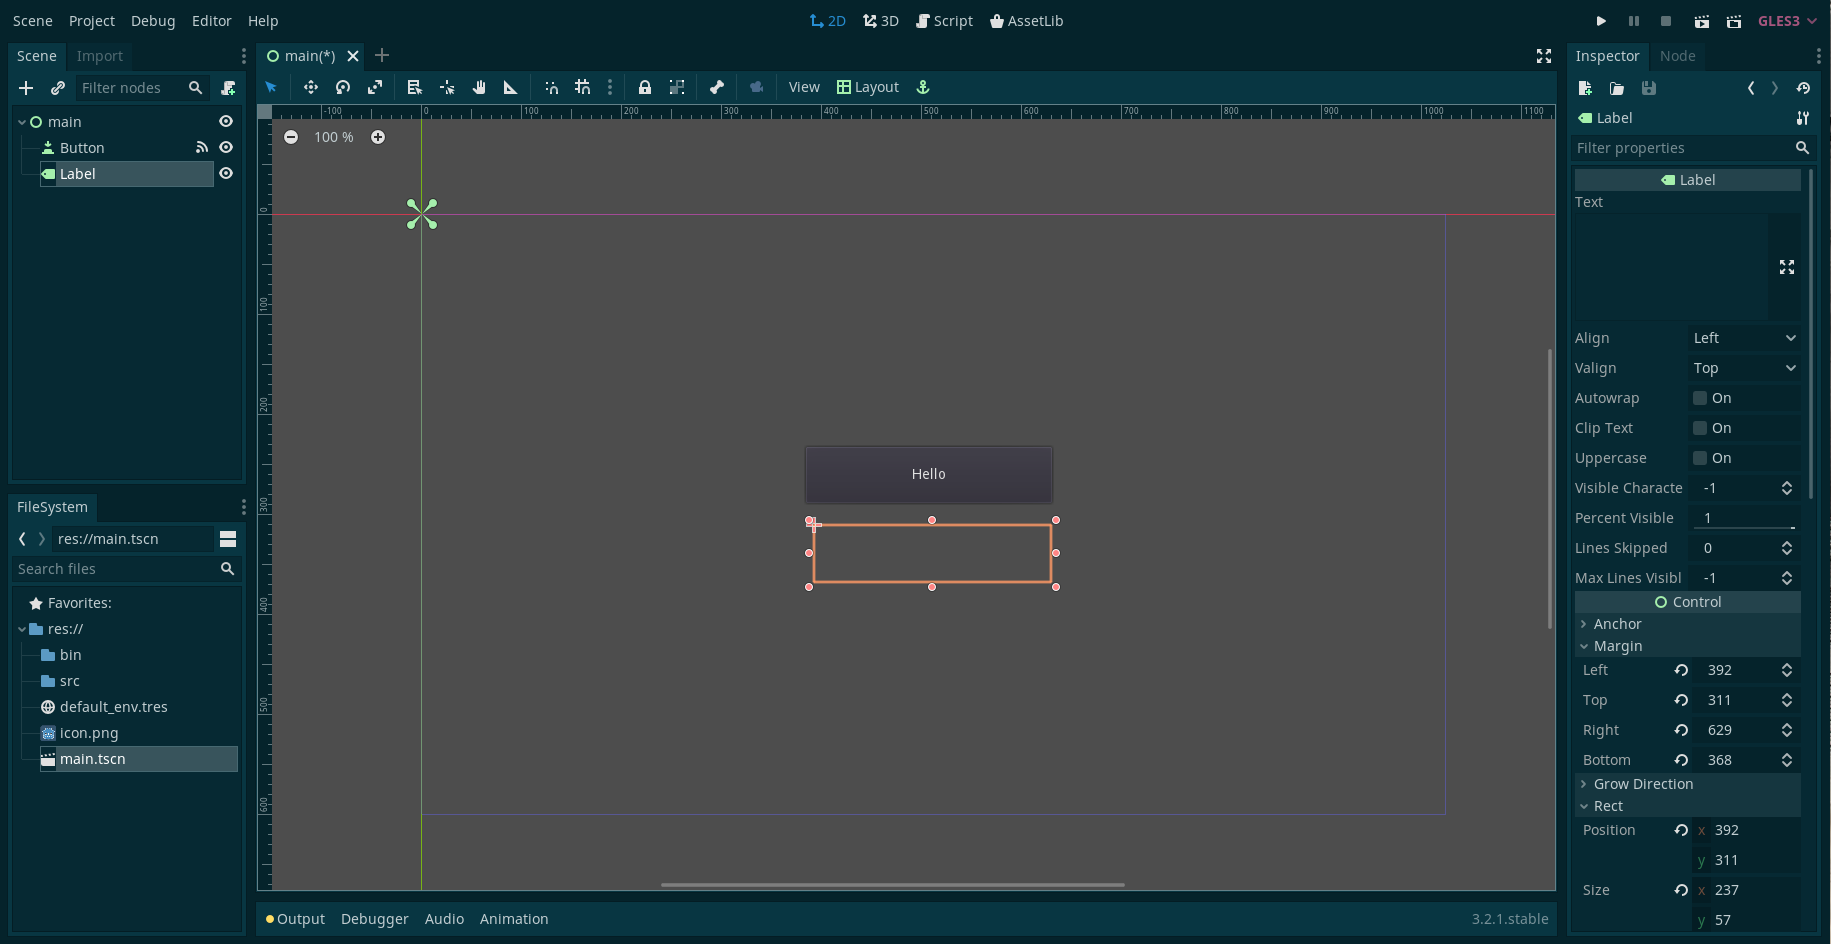
Add directories and main scene
Now create two directories in the root of the project called bin and src. When done create a new scene of type control. Set its anchor to full rect.
Add a button child node and move it to the center of the 2D canvas, set its size to x:246, y:56 under Rect property in the Inspector panel.
Add new child label to the control node give it the same size than the button in the previous step and move it below the button.
After completing these steps you shall have something like the screenshot below
Create a simple.go file into src directory
Create a new Go file with your preferred text editor in the src directory, we recommend Visual Studio Code with the Go and Godot Tools extensions but you can obviously use whatever you feel comfortable with.
you can not edit Go files with the integrated Godot editor even if you can create the file from within Godot UI itself
Add the Go code to the simple.go file
Copy and paste the block of code below into simple.go and save the file
package main

import (
	"fmt"

	"gitlab.com/pimpam-games-studio/gdnative-go/gdnative"
)

// SimpleClass is a structure that we can register with Godot.
type SimpleClass struct {
	base gdnative.Object
}

// Instances is a map of our created Godot classes. This will be populated when
// Godot calls the CreateFunc.
var Instances = map[string]*SimpleClass{}

// NativeScriptInit will run on NativeScript initialization. It is responsible
// for registering all our classes with Godot.
func nativeScriptInit() {
	gdnative.Log.Warning("Initializing nativescript from Go!")

	// Define an instance creation function. This will be called when Godot
	// creates a new instance of our class.
	createFunc := gdnative.InstanceCreateFunc{
		CreateFunc: simpleConstructor,          // reference to the constructor function
		MethodData: "SIMPLE",                   // name of the class the constructor is attached to
		FreeFunc:   func(methodData string) {}, // function for freeing resources (usually empty)
	}

	// Define an instance destroy function. This will be called when Godot
	// asks our library to destroy our class instance.
	destroyFunc := gdnative.InstanceDestroyFunc{
		DestroyFunc: simpleDestructor,           // reference to the destructor function
		MethodData:  "SIMPLE",                   // name of the class the destructor is attached to
		FreeFunc:    func(methodData string) {}, // function for freeing resources (usually empty)
	}

	// Register our class with Godot.
	gdnative.Log.Warning("Registering SIMPLE class...")
	gdnative.NativeScript.RegisterClass(
		"SIMPLE",     // the name of the class we are registering
		"Reference",  // class from which this class inherits from
		&createFunc,  // class constructor
		&destroyFunc, // class destructor
	)

	// Register a method with Godot.
	gdnative.Log.Warning("Registering SIMPLE method...")
	gdnative.NativeScript.RegisterMethod(
		"SIMPLE",   // the name of the class we are registering the method within
		"get_data", // the visible name for the method inside Godot
		&gdnative.MethodAttributes{ // Method RPC type, this will typically be Disabled unless RPC is required
			RPCType: gdnative.MethodRpcModeDisabled,
		},
		&gdnative.InstanceMethod{ // method wrapper
			Method:     simpleMethod,               // the simpleMethod function reference that implements our logic
			MethodData: "SIMPLE",                   // class name this method is attached to
			FreeFunc:   func(methodData string) {}, // function for freeing resources (usually empty)
		},
	)
}

func simpleConstructor(object gdnative.Object, methodData string) string {
	gdnative.Log.Println("Creating new SimpleClass...")

	// Create a new instance of our struct.
	instance := &SimpleClass{
		base: object,
	}

	// Use the pointer address as the instance ID
	instanceID := fmt.Sprintf("%p", instance)
	Instances[instanceID] = instance

	// Return the instanceID
	return instanceID
}

func simpleDestructor(object gdnative.Object, methodData, userData string) {
	gdnative.Log.Println("Destroying SimpleClass with ID:", userData, "...")
	// Delete the instance from our map of instances
	delete(Instances, userData)
}

func simpleMethod(object gdnative.Object, methodData, userData string, numArgs int, args []gdnative.Variant) gdnative.Variant {
	gdnative.Log.Println("SIMPLE.get_data() called!")

	data := gdnative.NewStringWithWideString("World from godot-go from instance: " + object.ID() + "!")
	ret := gdnative.NewVariantWithString(data)

	return ret
}

// The "init()" function is a special Go function that will be called when this library
// is initialized. Here we can register our Godot classes.
func init() {
	// Set the initialization script that will run upon NativeScript initialization.
	// This function will handle using the NativeScript API to register all of our
	// classes.
	gdnative.SetNativeScriptInit(nativeScriptInit)
}

// This never gets called, but it is necessary to export as a shared library.
func main() {
}
the code is fully commented, take some time to walk thought it
Create a simple Makefile
Create a simple Makefile in the root of the project with the following contents (Linux version)
all: build

build:
	go build -v -buildmode=c-shared -o ./bin/libsimple.so ./src/*.go

.PHONY: all
on Mac OS X you should change the building line to:
go build -v -buildmode=c-shared -o ./bin/libsimple.dylib ./src/*.go
on Windows you should change the building line to:
go build -v buildmode=c-shared -o ./bin/libsimple.dll ./src/*.go
if you use Windows check how to compile NativeScript libraries on your Windows version in the official Godot documentation
Compile the library
Now is time to compile the library using the make command in the root of the project, if everything goes as expected you will end with a shared library file inside the bin directory.
if you get an error saying cannot find package "github.com/vitaminwater/cgo.wchar" that means that for some reason the needed cgo.wchar package wasn’t auto installed in your system by go get, proceed to just get them in order to fix it with go get github.com/vitaminwater/cgo.wchar and try make again
Create a new GDNativeLibrary script
We need to create a new GDNativeLibrary script to load our newly compiled library into Godot, to do so you have several options
Use the properties Inspector
Click the icon in the properties Inspector on Godot interface and write GDNativeLibrary in the search window, that will create a new GDNativeLibrary on memory and its properties editor will automatically open in the botton panel on Godot’s gui. Ignore the edition panel for now and click on the icon, select Save as... in the contextual menu that appears, select the bin directory if is not already selected and save the file as simple.gdnlib.
Use the ‘New Resource’ contextual menu
Put your mouse over the bin directory we created at the very beginning and click with the right (or secondary) button, on the contextual menu that appears select New Resource, write GDNativeLibrary in the search window (it should autocomplete for you), in the saving window that will appear, save the new resource file as simple.gdnlib and press enter.
Link the shared library code to our new GDNativeLibrary
Click on the two arrow icon at the bottom right corner of the bottom panel, just right to the Godot’s version, you will be presented with the GDNativeLibrary edition GUI maximized, in case that you don’t have the GDNativeLibrary panel opened at the bottom, go to the simple.gdnlib file in the resource explorer and double click on it.
you can expand any bottom panel to make it use all the window height using that double up arrow icon, to turn it back to its original shape you just have to click on it again and it will shrink to its original size in the bottom of the central panel
In the editor you will find configuration for many platforms, you should provide a binary shared library for each platform that you want to support in your games, for the sake of simplicity we just set Linux/X11 on this example.
Click on icon of the Dynamic Library column on the 64 bits row (or in the 32 if your system is 32 bits) and select the libsimple.so file in the file dialog. You will end with something like the screen below.

if you are working in other platform use the right architecture and bits size for your system
Make sure the Load Once checkbox is check on the properties Inspector, click on the icon and select Save in the contextual menu to save our changes.
Create the NativeScript file
Now that Godot knows how to load our code we have to tell it about our SIMPLE class. In order to do it, we need to create a new NativeScript resource file. As before, we also have two options to create it.
Use the properties Inspector
Click the icon in the properties Inspector on Godot interface and write NativeScript in the search window, that will create a new NativeScript on memory and we should be able to edit its properties in the property Inspector. Click on the Library [empty] select menu and the in the icon, go to the bin directory in the file dialog and select our simple.gdnlib. Fill the ClassName value with our class name SIMPLE, click on the save icon and save the file in the bin directory as simple.gdns.
Use the ‘New Resource’ contextual menu
Put your mouse over the bin directory we created at the very beginning and click with the right (or secondary) button, on the contextual menu that appears select New Resource, write NativeScript in the search window (it should autocomplete for you), in the saving window that will appear, save the new resource file as simple.gdns and press enter. In the property Inspector. Click on the Library [empty] select menu and the in the icon, go to the bin directory in the file dialog and select our simple.gdnlib. Fill the ClassName value with our class name SIMPLE and click on the save icon to save our resource.
Attach new script
Now that we are in position to load and refer to our SIMPLE class we can open our main scene and attach a new script to it, on language select GDScript, leave the inheritance as it is, choose empty template and save it as main.gd in the root of the project. Copy and paste the following GDScript code into it and save it.
extends Control

# load the SIMPLE library
const SIMPLE = preload("res://bin/simple.gdns")
onready var data = SIMPLE.new()

func _on_Button_pressed():
	$Label.text = "Data = " + data.get_data()
Run the project
The final step is to run the project, click on the play icon at the top right of the screen or simply press the F5 key, a dialog indicating that we don’t have set up a main scene yet will popup, click on Select and select the main.tscn

You will get something similar to the screenshot above when you click the button
Congratulations
Congratulations! you created you first functional GDNative-Go Godot application.